Glue is a plugin that provides an interface to your shell from the Sublime Text editor. It features command entry within the Sublime Text editor window, standard output display in an editor view, and it works with most system utilities. This includes any compiled or interpreted source that you develop which effectively allows you to create Sublime Text extensions in any programming language that your system supports.
Here’s how you get started with it.
Install Glue in Your Sublime Text Editor
Glue works in Sublime Text versions 2 and 3 and these install instructions apply for either version.
Install with Package Control
If you are using [Package Control](//packagecontrol.io/, the install is simple. Open the Command Palette in your Sublime Text editor with the menus Tools > Command Palette and then type install in the text entry field. Select the option Package Control - Install Package. Next, type ‘glue’ in the text input box and select the ‘Glue’ plugin option that is displayed in the Command Palette. The install automatically takes place. You will see a confirmation in the status bar at the bottom of the editor window.
Install with Git
Open your Packages directory with the Sublime Text menu items Preferences > Browse Packages. Then git clone the Glue repository as a new directory named ‘Glue’ in your Packages directory with the following command:
OR
Install Manually
If you like to do things the good ole’ fashion way, download the source repository from GitHub (tar.gz | zip). Decompress the archive and rename it “Glue”.
Then, open your Sublime Text Packages directory using the Preferences > Browse Packages menu items and move the entire Glue directory into your Packages directory.
Confirm Your Install
Glue should automatically load in your editor after you install with any of the above approaches. You can confirm that it is installed by opening a project, right clicking in the sidebar and selecting the menu item Open Glue Terminal.
Confirm Your PATH
The next step is to confirm that your PATH is properly set in Glue. Glue assigns a default user PATH from your environment PATH variable. In general the PATH is correct, but on some installs it may require a bit of assistance.
First, check the PATH that Glue is using by entering the following command on the Glue command line:
$ glue path
This will display a colon-delimited PATH string for Unix/Linux users and a semicolon delimited PATH string for Windows users. If the PATH doesn’t match your existing system PATH, you can set a new Glue PATH string. This does not modify your existing system PATH.
To do this, open the Glue user settings JSON file by navigating to Preferences > Package Settings > Glue > Glue Settings - User. If you have not already entered settings in this file, it will appear as an empty buffer in Sublime Text. Create a JSON file with the following syntax:
{
	"glue_userpath": "your path string here"
}
Unix (including Mac OSX) and Linux users should enter a colon delimited string. Windows users should include semicolons as delimiters.
Here is an example for Unix/Linux users:
{
	"glue_userpath" : "/usr/local/bin:/usr/bin:/bin:/usr/sbin:/sbin"
}
and for Windows users:
{
	"glue_userpath": "C:\\Windows\\system32;C:\\Windows;C:\\Windows\\System32\\Wbem"
}
Windows users should escape their backward slashes as shown above.
Use Glue
Glue works with many of your favorite system utilities and allows you to extend what you can do inside the Sublime Text editor window. Here are a few examples:
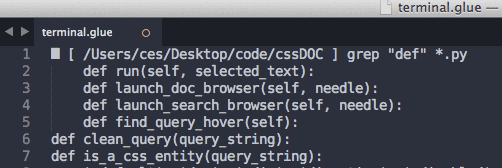
Glue + grep
$ grep "def" *.py

Glue + git
$ git init
$ git add .
$ git commit -m "'initial commit'"

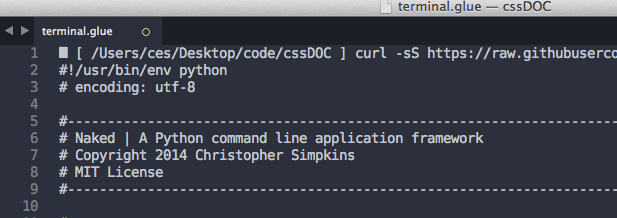
Glue + cURL
$ curl -sS //raw.githubusercontent.com/chrissimpkins/naked/master/lib/Naked/app.py

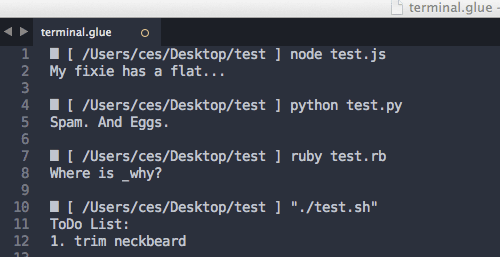
Glue + Your Own Scripts
$ node test.js
$ python test.py
$ ruby test.rb
$ ./test.sh

Glue Commands
Glue includes its own set of built in commands that let you navigate around your directory structure, manipulate the editor (e.g. create new buffers, open files by wildcard), and perform other useful tasks:
| Command | Description |
|---|---|
| cd | change directory |
| exit | exit the Glue terminal |
| glue browse | open URL or local project file in default browser |
| glue clear | clear text in the Glue view |
| glue finder | reveal current directory (default) or optional path in finder |
| glue help | view help documentation in Glue view |
| glue localhost | open default web browser to local server |
| glue new | open a new Sublime Text buffer |
| glue open | open one or more project files by filepath |
| glue path | display the system PATH setting that is used by Glue |
| glue user | display alphabetized list of your Glue user extensions |
| glue wco | open one or more files by wildcard pattern |
Extend Glue
You can extend the built-in Glue commands with aliases that support system utilities, your own compiled executables, shell scripts, and source from any scripting language that is supported on your machine.
These Glue aliases can be called from the command line with the syntax:
$ glue <your-command> [optional args]
They are incredibly simple to develop and require absolutely no programming knowledge (but can be hooked into anything that you develop with the capability to process data from the standard input stream).
Here are the steps to create your own extensions:
Create the Glue-Commands Directory
Create a Glue-Commands directory inside your Sublime Text Packages directory. You can open your Sublime Text Packages directory with the menu item Preferences > Browse Packages.
Create a glue.json File
Create a glue.json file inside the Glue-Commands directory.
Define Your Glue Extensions
Commands are defined in the glue.json file with a simple mapping of JSON key:value pairs using the following syntax
{
	"<command-name-1>": "<system command string 1>",
	"<command-name-2>": "<system command string 2>",
	[...]
}
You have the option to include replacement tags in your system command string that allow you to pass command line arguments, the text in your clipboard, or the current working directory path to the aliased command:
Glue Extension Replacement Tags
| Tag | Description |
|---|---|
| `` | additional arguments that you include on the command line |
| `` | the contents of the clipboard |
| `` | the working directory path |
JavaScript Minifier Extension Example
Here is an example that will take you through each of these steps to create a command that will minify and obfuscate a JavaScript file, and then save it in the same directory with the new path <filename>-min.js:
If you are following along, you can download YUICompressor from the GitHub repository. You will need to have Java version 1.4+ installed to use it. Unpack the repository and move the yuicompressor-2.4.8.jar file to a directory for safe keeping (you will run it from this directory).
Next, create a shell script named minijs.sh. Include the following script and modify the YUI_PATH variable with the actual path to your YUICompressor jar file:
JavaScript Minifier Shell Script
#!/bin/sh

# Modify YUI_PATH with the path to the yuicompressor jar file
YUI_PATH="path/to/yuicompressor-2.4.8.jar"

if [ $# -eq 0 ]; then
  echo "Please include the file path(s) for the file(s) that you would like to compress." 1>&2
  exit 1
fi

for file in "$@";
do
if [ -f "$file" ]; then
      java -jar "$YUI_PATH" -o "${file%%.*}-min.js" "$file"
      if (( $? )); then
          echo "$file was not able to be minified"
          exit 1
      else
          echo "$file was minified to ${file%%.*}-min.js"
      fi
  else
      echo "Unable to find the javascript file '$file'."
fi
done;
exit 0
Next, create a Glue extension that will serve as an alias for the call to this shell script when you use the glue minijs command. We’ll include the `` template tag so that we can pass filepath arguments to our script. Insert the following in your glue.json file that you generated above:
{
  "minijs" : "/path/to/minijs.sh { {args} }"
}
To use your new Sublime Text feature, launch Glue in your editor and minify JS files in the working directory with a command like this:
$ glue minijs awesome.js
The minified file is saved as awesome-min.js in the same directory.
You can use the same technique with any compiled application or interpreted script that accepts the standard input stream and returns the data to be displayed for the user in the standard output stream. Glue provides the interface with your shell to take care of the rest.
Learn More
The Glue documentation is available here.

Response to “Glue - A Terminal for Sublime Text”